JavaFX 2 with Spring
I’m going to start this one with a bold statement: I always liked Java Swing, or applets for that matter. There, I said it. If I perform some self analysis, this admiration probably started when I got introduced to Java. Swing was (practically) the first thing I ever did with Java that gave some statisfactionary result and made me able to do something with the language at the time. When I was younger we build home-brew fat clients to manage our 3.5” floppy/CD collection (written in VB and before that in basic) this probably also played a role.
Anyway, enough about my personal rareness. Fact is that Swing has helped many build great applications but as we all know Swing has it drawbacks. For starters it hasn’t been evolving since well, a long time. It also requires a lot of boiler plate code if you want to create high quality code. It comes shipped with some quirky design “flaws”, lacks out of the box patterns such as MVC. Styling is a bit of a limitation since you have to fall back on the limited L&F architecture, I18N is not build in by default and so on. One could say that developing Swing these days is well, basically going back into time.
Fortunately Oracle tried to change this some years ago by Launching JavaFX. I recall getting introduced to JavaFX on Devoxx (or Javapolis as it was named back then). The nifty demo’s looked very promising, so I was glad to see that a Swing successor was finally on its way. This changed from the moment I saw its internals. One of its major drawbacks was that it was based on a dark new syntax (called JavaFX script). In case you have never seen JavaFX script; it looks like a bizarre breed between Java, JSON and JavaScript. Although it is compiled to Java byte-code, and you could use the Java API’s from it, integration with Java was never really good.
The language itself (although pretty powerful) required you to spend a lot of time understanding the details, for ending up with, well, again source code, but this time less manageable and supported then plain Java code. As it turned out, I wasn’t the only one. A lot of people felt the same (for sure there were other reasons as well) and JavaFX never was a great success.
However, a while ago Oracle changed the tide by introducing JavaFX 2.
First of all they got rid of JavaFX script (which is no longer supported) and turned it into a real native Java SE API (JavaFX 2.2.3 is part of the Java 7 SE update 6) . The JavaFX API now looks more like the familiar Swing API, which is a good thing. It gives you layout managers lookalikes, event listeners, and all those other components you were so used to, but even better. So if you want you can code JavaFX like you did Swing you can, albeit with slightly different syntax and improved architecture. It is also possible now to intermix existing Java Swing applications with JavaFX.
But there is more. They introduced an XML based markup language that allows you to describe the view. This has some advantages, first of all coding in XML works faster then Java. XML can be more easily be generated then Java and the syntax for describing a view is simply more compact. It is also more intuitive to express a view using some kind of markup, especially if you ever did some web development before. So, one can have the view described in FXML (thats how its called), the application controllers separate from the view, both in Java, and your styling in CSS (yeah, so no more L&F, CSS support is standard). You can still embed Java (or other languages) directly in the FXML; but this is probably not what you want (scriptlet anti-pattern). Another nice thing is support for binding. You can bind each component in your view to the application controller by putting an fx:id attribute on the view component and an @FXML annotation on the instance variable in the application controller. The corresponding element will then be auto injected, so you can change its data or behavior from inside your application controller. It also turns out that with some lines of code you can painlessly integrate the DI framework of your choice, isn’t that sweet?
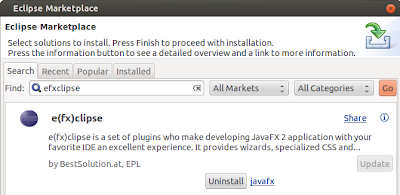
And what about the tooling? Well, first of all there is a plug-in for Eclipse (fxclipse) which will render you FXML on the fly. You can install it via Eclipse market place:
The plug-in will render any adjustment you make immediately:
Note that you need at least JDK7u6 for this plug-in to work. If your JDK is too old you’ll get an empty pane in eclipse. Also, if you create a JavaFX project I needed to put the jfxrt.jar manually on my build classpath. You’ll find this file in %JAVA_HOME%/jre/lib.
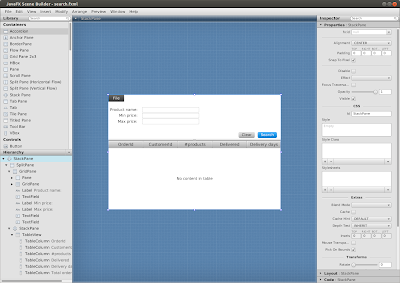
Up until know the plug-in doesn’t help you visually (by drag& drop) but that there a separate IDE: scene builder. This builder is also integrated in Netbeans, for AFAIK there is no support for eclipse yet so you’ll have to run it separately if you want to use it. The builder lets you develop FXML the visual way, using drag&drop. Nice detail; scene builder is in fact written in JavaFX. Then you also have a separate application called scenic view which does introspection on a running JavaFX application and shows how it is build up. You get a graph with the different nodes and their hierarchical structure. For each node you can see its properties and so forth:
Ok, so lets start with some code examples. The first thing I did was design my demo application in scene builder:
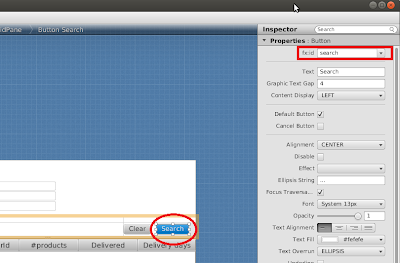
I did this graphically by d&d the containers/controlers on to the view. I also gave the controls that I want to bind to my view and fx:id, you can do that also via scene builder:
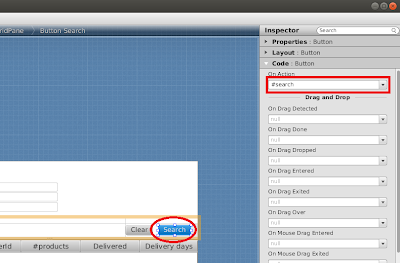
For the buttons in particular I also added an onAction (which is the method that should be executed on the controller once the button is clicked):
Next I added the controller manually in the source view in eclipse. There can only be one controller per FXML and it should be declared in the top level element. I made two FXML’s, one that represents the main screen and one that acts as the menu bar. You probably want a division of your logic in multiple controllers, rather then stuffing to much in a single controller – single responsibility is a good design guideline here. The first FXML is “search.fxml” and represents the search criteria and result view:
<?xml version="1.0" encoding="UTF-8"?>

<?import java.lang.*?>
<?import java.util.*?>
<?import javafx.scene.control.*?>
<?import javafx.scene.control.Label?>
<?import javafx.scene.control.cell.*?>
<?import javafx.scene.layout.*?>
<?import javafx.scene.paint.*?>

<StackPane id="StackPane" maxHeight="-Infinity" maxWidth="-Infinity" minHeight="-Infinity" minWidth="-Infinity" prefHeight="400.0" prefWidth="600.0" xmlns:fx="http://javafx.com/fxml" fx:controller="be.error.javafx.controller.SearchController">
  <children>
    <SplitPane dividerPositions="0.39195979899497485" focusTraversable="true" orientation="VERTICAL" prefHeight="200.0" prefWidth="160.0">
      <items>
        <GridPane fx:id="grid" prefHeight="91.0" prefWidth="598.0">
          <children>
     <fx:include source="/menu.fxml"/>
            <GridPane prefHeight="47.0" prefWidth="486.0" GridPane.columnIndex="1" GridPane.rowIndex="5">
              <children>
                <Button fx:id="clear" cancelButton="true" mnemonicParsing="false" onAction="#clear" text="Clear" GridPane.columnIndex="1" GridPane.rowIndex="1" />
                <Button fx:id="search" defaultButton="true" mnemonicParsing="false" onAction="#search" text="Search" GridPane.columnIndex="2" GridPane.rowIndex="1" />
              </children>
              <columnConstraints>
                <ColumnConstraints hgrow="SOMETIMES" maxWidth="338.0" minWidth="10.0" prefWidth="338.0" />
                <ColumnConstraints hgrow="SOMETIMES" maxWidth="175.0" minWidth="0.0" prefWidth="67.0" />
                <ColumnConstraints hgrow="SOMETIMES" maxWidth="175.0" minWidth="10.0" prefWidth="81.0" />
              </columnConstraints>
              <rowConstraints>
                <RowConstraints maxHeight="110.0" minHeight="10.0" prefHeight="10.0" vgrow="SOMETIMES" />
                <RowConstraints maxHeight="72.0" minHeight="10.0" prefHeight="40.0" vgrow="SOMETIMES" />
              </rowConstraints>
            </GridPane>
            <Label alignment="CENTER_RIGHT" prefHeight="21.0" prefWidth="101.0" text="Product name:" GridPane.columnIndex="0" GridPane.rowIndex="1" />
            <TextField fx:id="productName" prefWidth="200.0" GridPane.columnIndex="1" GridPane.rowIndex="1" />
            <Label alignment="CENTER_RIGHT" prefWidth="101.0" text="Min price:" GridPane.columnIndex="0" GridPane.rowIndex="2" />
            <Label alignment="CENTER_RIGHT" prefWidth="101.0" text="Max price:" GridPane.columnIndex="0" GridPane.rowIndex="3" />
            <TextField fx:id="minPrice" prefWidth="200.0" GridPane.columnIndex="1" GridPane.rowIndex="2" />
            <TextField fx:id="maxPrice" prefWidth="200.0" GridPane.columnIndex="1" GridPane.rowIndex="3" />
          </children>
          <columnConstraints>
            <ColumnConstraints hgrow="SOMETIMES" maxWidth="246.0" minWidth="10.0" prefWidth="116.0" />
            <ColumnConstraints fillWidth="false" hgrow="SOMETIMES" maxWidth="537.0" minWidth="10.0" prefWidth="482.0" />
          </columnConstraints>
          <rowConstraints>
            <RowConstraints maxHeight="64.0" minHeight="10.0" prefHeight="44.0" vgrow="SOMETIMES" />
            <RowConstraints maxHeight="68.0" minHeight="0.0" prefHeight="22.0" vgrow="SOMETIMES" />
            <RowConstraints maxHeight="68.0" minHeight="10.0" prefHeight="22.0" vgrow="SOMETIMES" />
            <RowConstraints maxHeight="68.0" minHeight="10.0" prefHeight="22.0" vgrow="SOMETIMES" />
            <RowConstraints maxHeight="167.0" minHeight="10.0" prefHeight="14.0" vgrow="SOMETIMES" />
            <RowConstraints maxHeight="167.0" minHeight="10.0" prefHeight="38.0" vgrow="SOMETIMES" />
          </rowConstraints>
        </GridPane>
        <StackPane prefHeight="196.0" prefWidth="598.0">
          <children>
            <TableView fx:id="table" prefHeight="200.0" prefWidth="200.0">
              <columns>
                <TableColumn prefWidth="120.0" resizable="true" text="OrderId">
                  <cellValueFactory>
                    <PropertyValueFactory property="orderId" />
                  </cellValueFactory>
                </TableColumn>
                <TableColumn prefWidth="120.0" text="CustomerId">
                  <cellValueFactory>
                    <PropertyValueFactory property="customerId" />
                  </cellValueFactory>
                </TableColumn>
                <TableColumn prefWidth="120.0" text="#products">
                  <cellValueFactory>
                    <PropertyValueFactory property="productsCount" />
                  </cellValueFactory>
                </TableColumn>
                <TableColumn prefWidth="120.0" text="Delivered">
                  <cellValueFactory>
                    <PropertyValueFactory property="delivered" />
                  </cellValueFactory>
                </TableColumn>
                <TableColumn prefWidth="120.0" text="Delivery days">
                  <cellValueFactory>
                    <PropertyValueFactory property="deliveryDays" />
                  </cellValueFactory>
                </TableColumn>
                <TableColumn prefWidth="150.0" text="Total order price">
                  <cellValueFactory>
                    <PropertyValueFactory property="totalOrderPrice" />
                  </cellValueFactory>
                </TableColumn>
              </columns>
            </TableView>
          </children>
        </StackPane>
      </items>
    </SplitPane>
  </children>
</StackPane>
On line 11 you can see that I configured the application controller class that should be used with the view. On line 17 you can see the import of the separate menu.fxml which is shown here:
<?xml version="1.0" encoding="UTF-8"?>

<?import javafx.scene.control.*?>
<?import javafx.scene.layout.*?>
<?import javafx.scene.control.MenuItem?>

<Pane prefHeight="465.0" prefWidth="660.0" xmlns:fx="http://javafx.com/fxml" fx:controller="be.error.javafx.controller.FileMenuController">
 <children>
  <MenuBar layoutX="0.0" layoutY="0.0">
   <menus>
    <Menu mnemonicParsing="false" text="File">
     <items>
      <MenuItem text="Exit" onAction="#exit" />
     </items>
    </Menu>
   </menus>
  </MenuBar>
 </children>
</Pane>
On line 7 you can see that it uses a different controller. In Eclipse, if you open the fxclipse view from the plug-in you will get the same rendered view as in scene builder. Its however convenient if you want to make small changes in the code to see them directly reflected: The code for launching the application is pretty standard:
package be.error.javafx;

import javafx.application.Application;
import javafx.scene.Parent;
import javafx.scene.Scene;
import javafx.stage.Stage;

public class TestApplication extends Application {

 private static final SpringFxmlLoader loader = new SpringFxmlLoader();

 @Override
 public void start(Stage primaryStage) {
  Parent root = (Parent) loader.load("/search.fxml");
  Scene scene = new Scene(root, 768, 480);
  primaryStage.setScene(scene);
  primaryStage.setTitle("JavaFX demo");
  primaryStage.show();
 }

 public static void main(String[] args) {
  launch(args);
 }
}
The only special thing to note is that we extend from Application. This is a bit boiler plate code which will for example make sure that creating of the UI happens on the JavaFX application thread. You might remember such stories from Swing, where every UI interaction needs to occur on the event dispatcher thread (EDT), this is the same with JavaFX. You are by default on the “right thread” when you are called back by the application (in for example action listeners alike methods). But if you start the application or perform long running tasks in separate threads you need to make sure you start UI interaction on the right thread. For swing you would use SwingUtilities.invokeLater() for JavaFX: Platform.runLater(). More special is our SpringFxmlLoader:
package be.error.javafx;

import java.io.IOException;
import java.io.InputStream;

import javafx.fxml.FXMLLoader;
import javafx.util.Callback;

import org.springframework.context.ApplicationContext;
import org.springframework.context.annotation.AnnotationConfigApplicationContext;

public class SpringFxmlLoader {

 private static final ApplicationContext applicationContext = new AnnotationConfigApplicationContext(SpringApplicationConfig.class);

 public Object load(String url) {
  try (InputStream fxmlStream = SpringFxmlLoader.class
    .getResourceAsStream(url)) {
   System.err.println(SpringFxmlLoader.class
    .getResourceAsStream(url));
   FXMLLoader loader = new FXMLLoader();
   loader.setControllerFactory(new Callback<Class<?>, Object>() {
    @Override
    public Object call(Class<?> clazz) {
     return applicationContext.getBean(clazz);
    }
   });
   return loader.load(fxmlStream);
  } catch (IOException ioException) {
   throw new RuntimeException(ioException);
  }
 }
}
The highlighted lines show the custom ControllerFactory. Without setting this JavaFX will simply instantiate the class you specified as controller in the FXML without anything special. In that case the class will not be Spring managed (unless you would be using CTW/LTW AOP). By specifying a custom factory we can define how the controller should be instantiated. In this case we lookup the bean from the application context. Finally we have our two controllers, the SearchController:
package be.error.javafx.controller;

import java.math.BigDecimal;
import java.net.URL;
import java.util.ResourceBundle;

import javafx.collections.FXCollections;
import javafx.collections.ObservableList;
import javafx.fxml.FXML;
import javafx.fxml.Initializable;
import javafx.scene.control.Button;
import javafx.scene.control.TableView;
import javafx.scene.control.TextField;

import org.apache.commons.lang.StringUtils;
import org.springframework.beans.factory.annotation.Autowired;

import be.error.javafx.model.Order;
import be.error.javafx.model.OrderSearchCriteria;
import be.error.javafx.model.OrderService;

public class SearchController implements Initializable {

 @Autowired
 private OrderService orderService;
 @FXML
 private Button search;
 @FXML
 private TableView<Order> table;
 @FXML
 private TextField productName;
 @FXML
 private TextField minPrice;
 @FXML
 private TextField maxPrice;

 @Override
 public void initialize(URL location, ResourceBundle resources) {
  table.setColumnResizePolicy(TableView.CONSTRAINED_RESIZE_POLICY);
 }

 public void search() {
  OrderSearchCriteria orderSearchCriteria = new OrderSearchCriteria();
  orderSearchCriteria.setProductName(productName.getText());
  orderSearchCriteria
    .setMaxPrice(StringUtils.isEmpty(minPrice.getText()) ? null:new BigDecimal(minPrice.getText()));
  orderSearchCriteria
    .setMinPrice(StringUtils.isEmpty(minPrice.getText()) ? null: new BigDecimal(minPrice.getText()));
  ObservableList<Order> rows = FXCollections.observableArrayList();
  rows.addAll(orderService.findOrders(orderSearchCriteria));
  table.setItems(rows);
 }

 public void clear() {
  table.setItems(null);
  productName.setText("");
  minPrice.setText("");
  maxPrice.setText("");
 }
}
The highlighted lines in respective order:
- Auto injection by Spring, this is our Spring managed service which we will use to lookup data from
- Auto injection by JavaFX, our controls that we need to manipulate or read from in our controller
- Special init method to initialize our table so columns will auto resize when the view is enlarged
- action listener style callback which is invoked when the search button is pressed
- action listener style callback which is invoked when the clear button is pressed
Finally the FileMenuController which does nothing special besides closing our app:
package be.error.javafx.controller;

import javafx.application.Platform;
import javafx.event.ActionEvent;

public class FileMenuController {

 public void exit(ActionEvent actionEvent) {
  Platform.exit();
 }
}
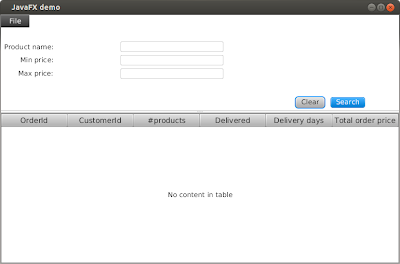
And finally the (not so exciting) result:
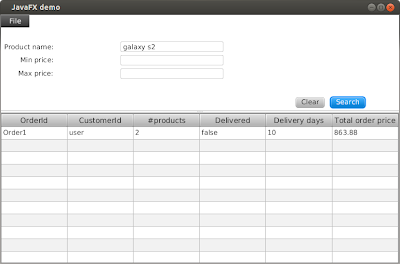
After searching:
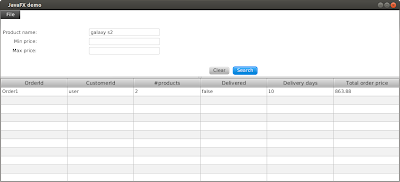
Making view wider, also stretches the columns:
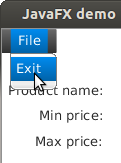
The file menu allowing us the exit:
After playing a bit with JavaFX2 I was pretty impressed. There are also more and more controls coming (I believe there is already a browser control and such). So I think we are on the right track here.


